How to Design and Print Custom Labels in Canva (Easy & Pretty!)

There’s something so satisfying about a good label.
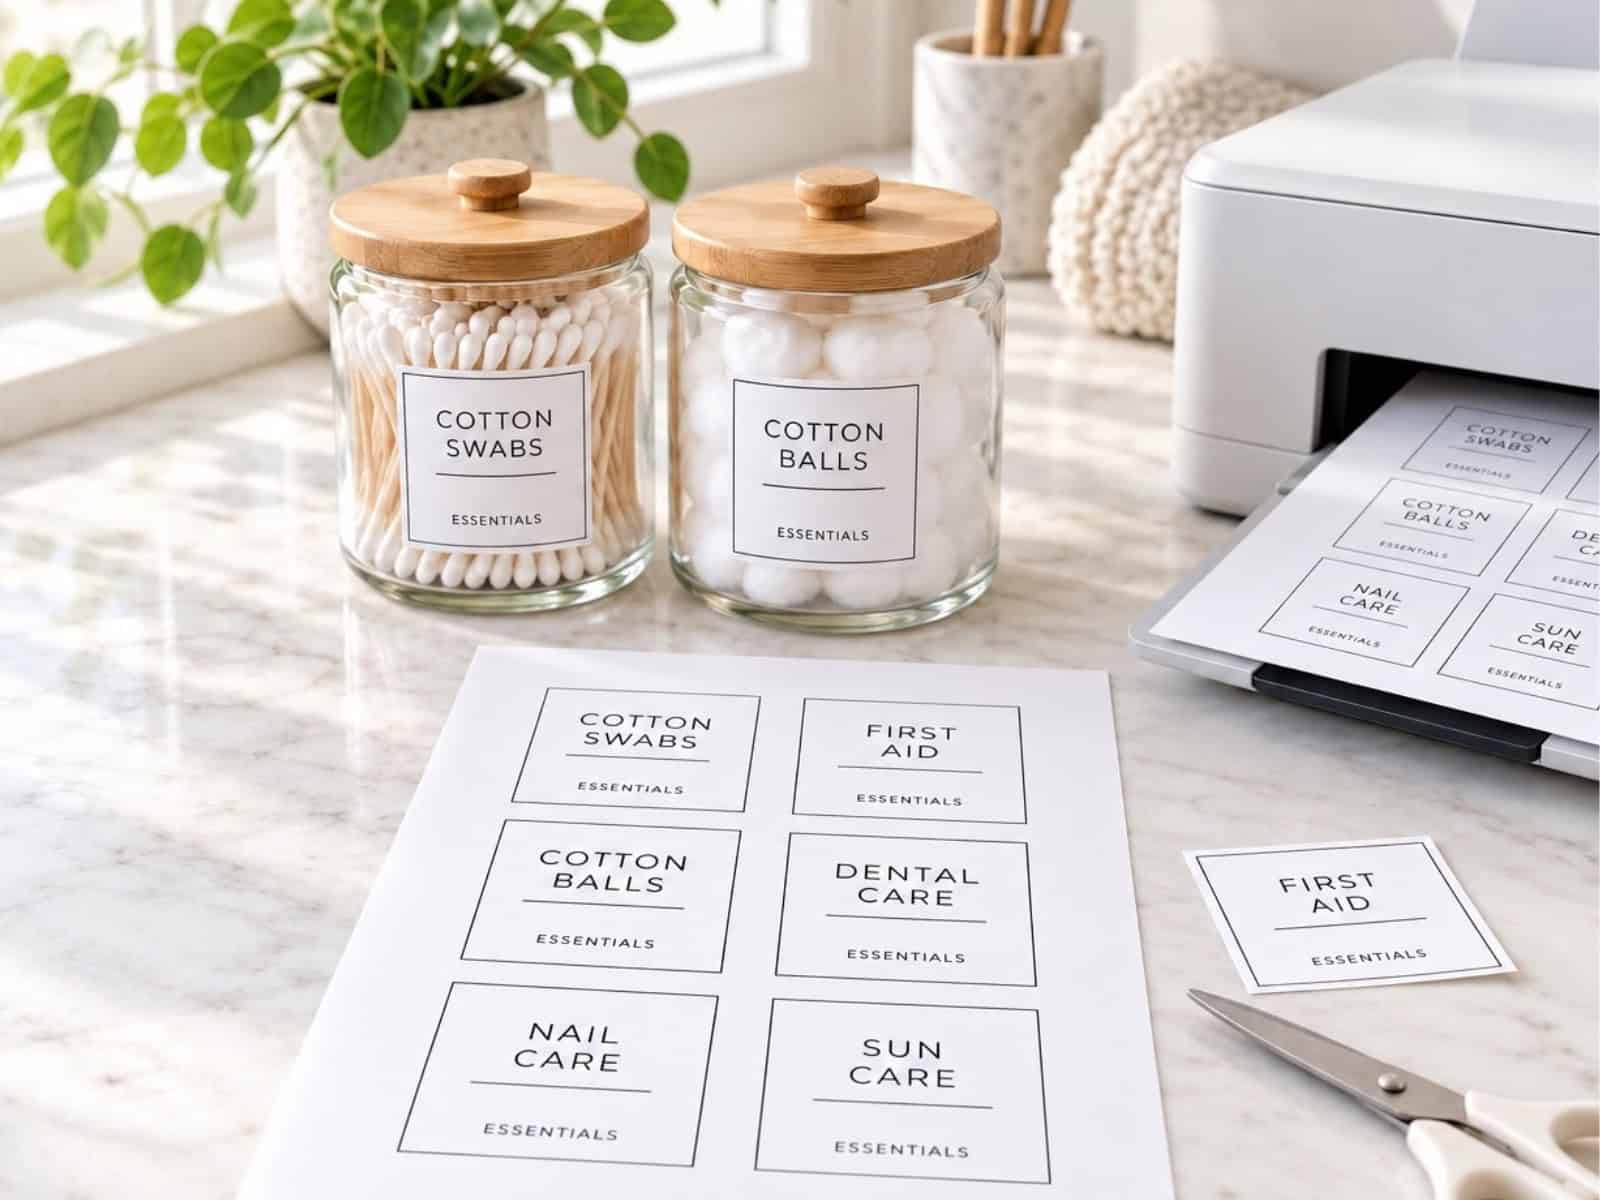
Not just because it makes everything look tidy (though that’s a huge bonus), but because it makes your home function better. When everything is labeled clearly, it reduces repeat questions like “Where does this go?” and helps everyone—kids, partners, and guests—put things back where they belong. (A win for everyone.)
Over the years, I’ve created labels in nearly every way possible: handwritten, with a label maker, in Microsoft Word, and even by tracing with a Sharpie. And while those all work, I’ve found one method that’s not only the easiest, but also the prettiest—and free.
Enter: Canva.
Whether you’re organizing your pantry, craft supplies, bathroom drawers, or playroom bins, I’ll walk you through exactly how to create gorgeous, custom labels in Canva that you can print at home—no design skills or expensive gadgets needed.
Let’s get started!
This post contains affiliate links. For more information, see my disclosures here.
Section 1: What You’ll Need
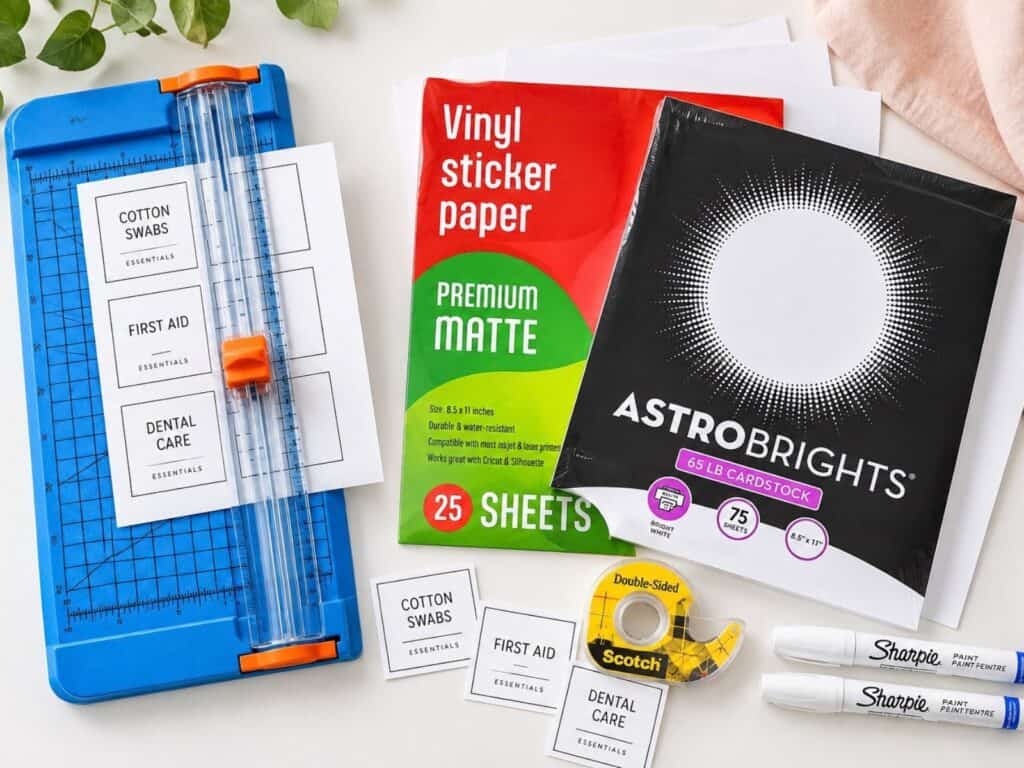
You don’t need much to create beautiful labels, which is part of why I love this method. Here’s what I use:
- A free Canva account – You’ll design everything online at Canva.com. No need to download anything.
- A computer or laptop – Canva works on mobile, but for labels, a full screen makes life easier.
- A compatible printer: Check that your printer supports the sticker paper or cardstock you plan to use. Choose paper marked for your printer type—inkjet, laser, or both—and follow its loading instructions.
- White cardstock or sticker paper – I prefer matte sticker paper for a clean, seamless look, but cardstock + tape works just as well.
- Scissors or a paper trimmer – For trimming your labels cleanly.
- Optional – Laminator, ribbon, clear tape, or velcro dots.
🛠️ Quick tip: For fabric bins or baskets, hole-punched cardstock tied on with ribbon is a simple option. For containers near water, check the label material’s water-resistance instructions. Clear sticker paper is not automatically waterproof, and the finished label’s durability also depends on the ink and printing method.
Now that your supplies are ready, let’s get started in Canva and begin designing!
Section 2: Step-by-Step – How I Make Labels in Canva
Step 1: Create Your Design
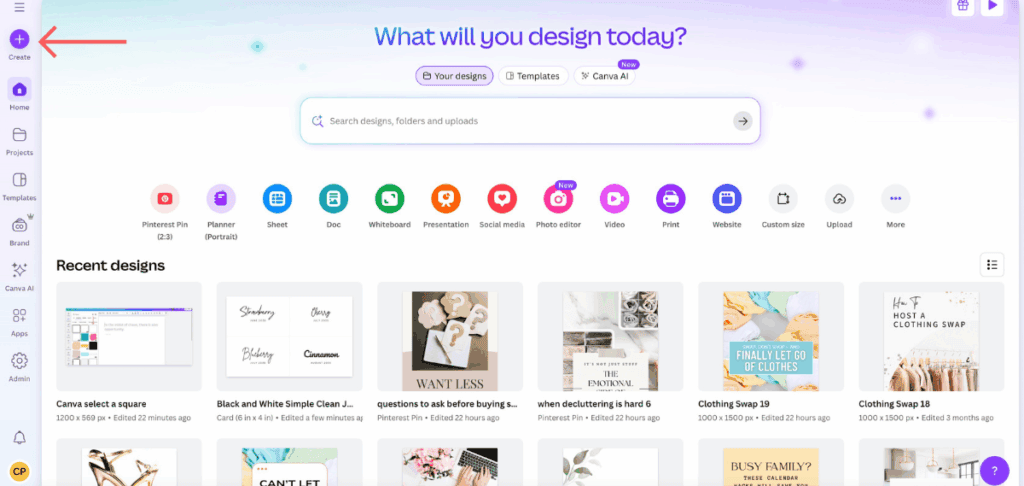
Once you’re logged into Canva, click the purple “Create” button in the top left.
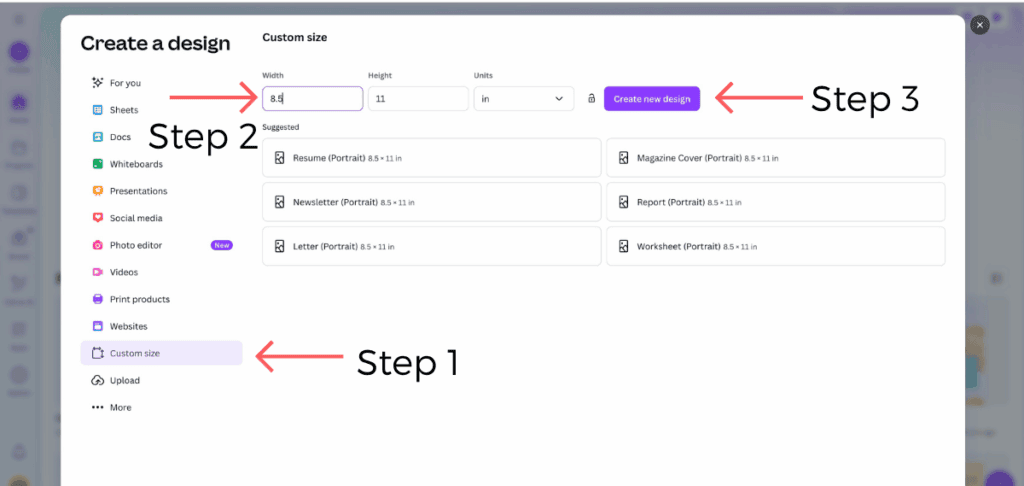
Select Custom size, choose inches, and enter 8.5 for the width and 11 for the height if you’re using US Letter paper. If you use A4 paper, choose an A4 document instead. Your design’s page size should match the paper you’ll print on.
Choose Your Paper Before Arranging the Labels
For the tutorial below, use a full sheet of sticker paper or cardstock and cut out the labels after printing. Starting with a blank page lets you choose the size, shape, and spacing.
Pre-cut label sheets need a different setup. The design must match the exact label size, gaps, and margins on the sheet. Use the manufacturer’s template for your product number rather than arranging labels by eye on a blank page.
Before designing, measure the space where your label will go. A square that works on a storage bin may be too large for a small jar. Leave room around the wording so you can read it easily.
Step 2: Add a Shape
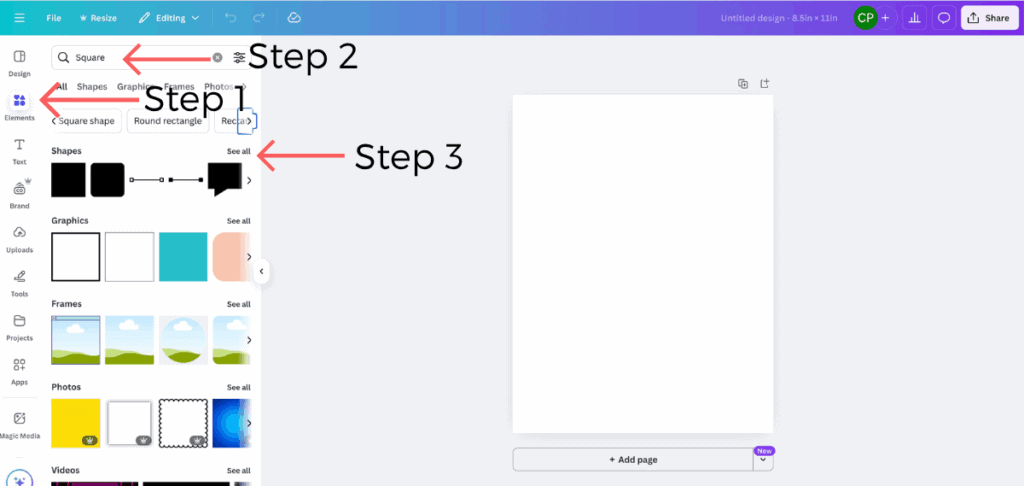
Next, navigate to the “Elements” tab on the left-hand menu and search for a shape that suits your needs. You can type “circle,” “rectangle,” “tag,” or even “label” into the search bar or click one that’s already listed. Click one that fits your style. I clicked “Square” and “See All” under graphics.
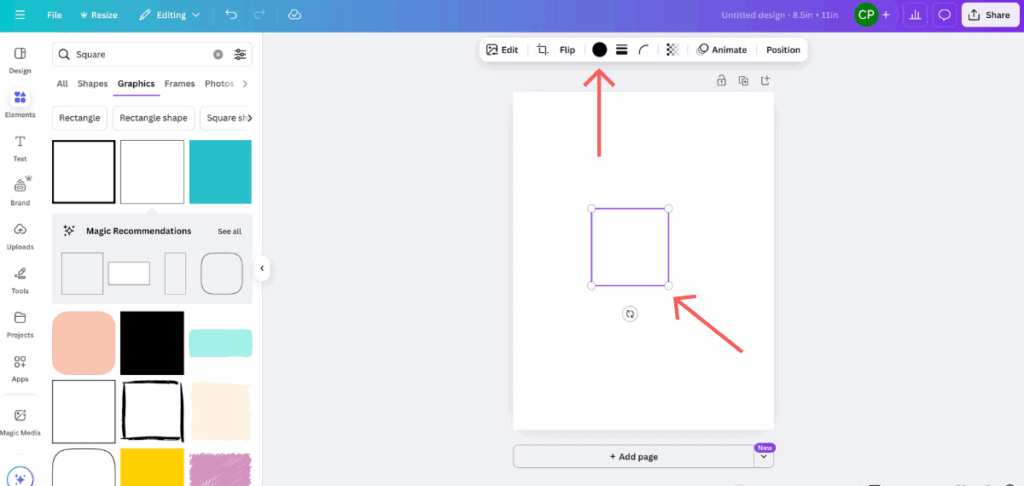
Then click on the image that you want to use. I chose a square with a thin line. Once it’s on your canvas:
- Resize the shape to suit your container. Drag the corner handles to adjust it, leaving space between labels for cutting. Treat the on-screen size as a starting point: print a plain-paper test at 100% scale, measure the label, and check it against your container before printing the whole sheet on sticker paper.
- Change the color by clicking the colored square in the top bar. I tend to use neutrals or soft pastels for a clean, cohesive look, but you can match your home vibe or even color-code by room.

For this label design, I chose a white square with a black outline, so changing the color will only affect the outline. If you prefer a solid-colored shape (such as a filled-in square or circle), ensure that you choose one without an outline from the start. Canva offers a wide range of both styles under the Elements tab, so feel free to experiment until you find one that suits your look.
Step 3: Add Text
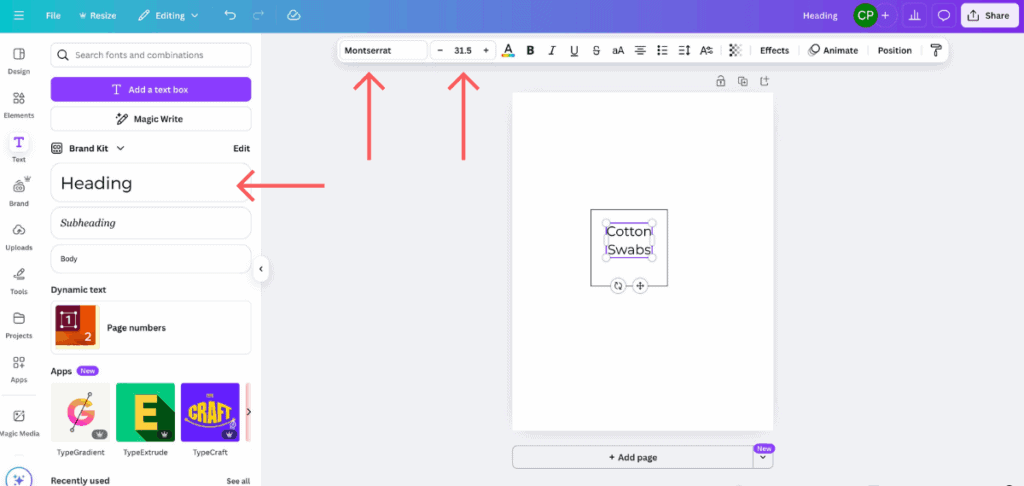
Now let’s label that label! On the left menu, click “Text” and choose “Heading.” A text box will appear—this is where you’ll type the name of your item. For example:
- Flour
- Snacks
- Hair Ties
- Markers
Once your text is selected, you can customize it using the menu at the top. Choose your font. Here are some suggestions:
- Brusher – for a fun handwritten look
- Playlist Script – if you love The Home Edit vibe
- Montserrat – clean and modern
- Libre Baskerville – classic and readable
- Lora – great for a slightly more elegant touch
Adjust the font size until it fits your shape, and drag the text into the center. Canva’s pink alignment lines are your best friend here—they’ll snap the text right into place.
Step 4: Duplicate & Customize
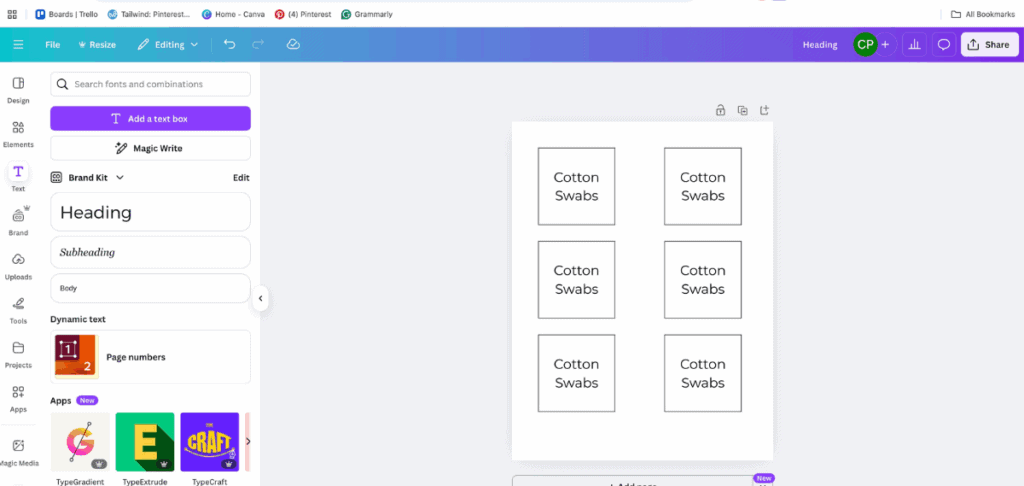
Once your shape and text are just how you like them:
- Hold down Shift and click both the shape and the text.
- Right-click and choose “Group” – this locks them together, keeping them aligned.
- Right-click again and choose “Duplicate.” Boom—you’ve got another label ready to go!

To customize each one:
- Right-click the duplicated group and choose “Ungroup.”
- Double-click the text to change it to your next item (“Sugar,” “Rice,” “Legos,” etc.)
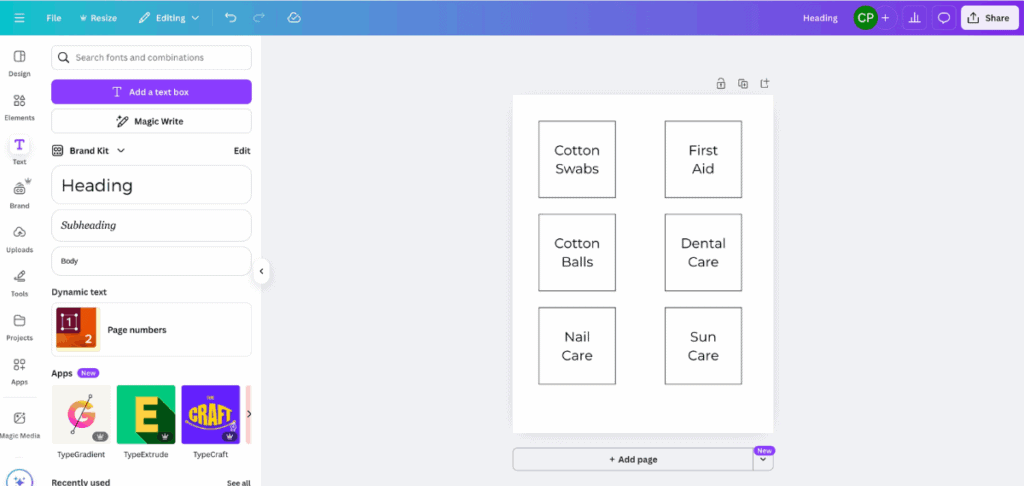
Repeat until your page is filled with beautiful, custom-made labels!
Section 3: Download + Print Your Labels
You’ve designed your gorgeous labels—now it’s time to bring them to life!
Download Your Labels
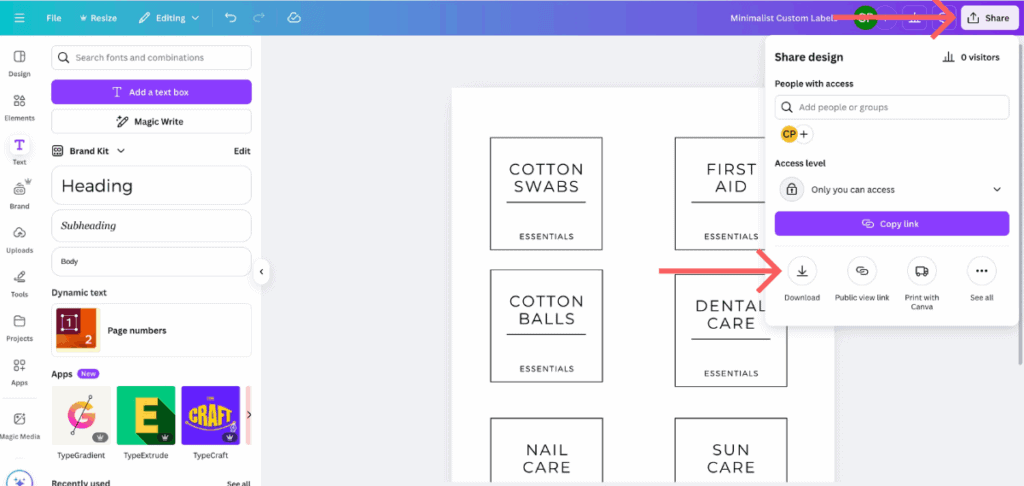
When your label sheet is ready, select Share → Download, then choose PDF Print.
For this full-page sheet of labels you’ll cut out at home, leave Crop marks and bleed unchecked. You want the downloaded page to match your paper size. If a print shop is handling the job, follow its file requirements instead.

In the file type menu, select “PDF Print” —this provides the highest resolution for printing. Then click Download.
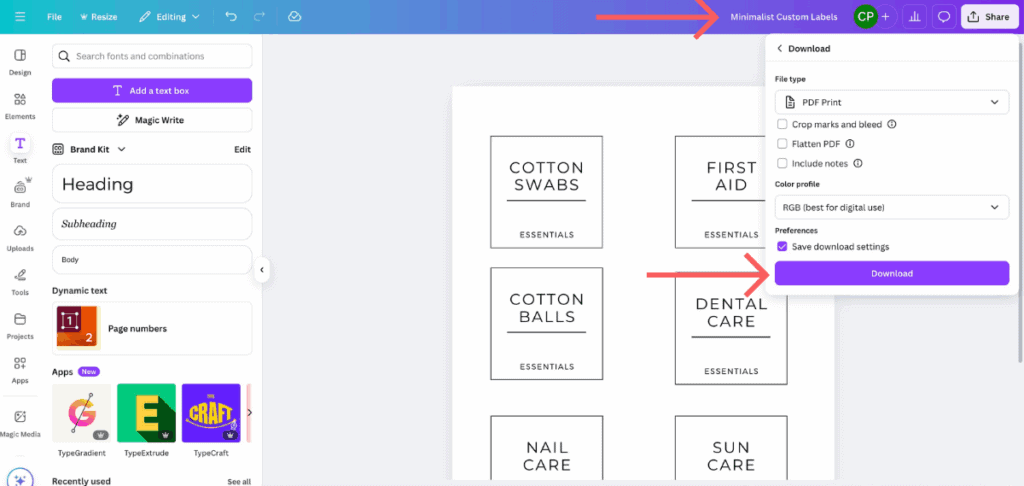
Choose the pages you want and download the PDF. Give it a name you’ll recognize later, such as “Bathroom Storage Labels.”
Keep the editable Canva design too. That way, you can change the wording or add another label without rebuilding the sheet.
Bonus tip: Canva saves everything automatically in your account, so you can go back and update or reprint your labels at any time—no need to start from scratch!
Print a Test Before Using Sticker Paper
A quick test can save you a sheet of labels—and the frustration of discovering that everything printed too small.
- Open the downloaded PDF and select Print.
- Match the paper size to your design. Choose US Letter for an 8.5 × 11-inch page or A4 for an A4 page.
- Choose Actual Size or 100% scale. Avoid “Fit to page” or “Shrink to fit” when you want to preserve the label dimensions.
- Print one page on plain paper. Measure a label, cut it out, and hold it against the container. Check that the wording is easy to read.
- Adjust the design if needed. Download a new PDF after making changes in Canva.
If you’re using pre-cut label sheets, place the plain-paper print behind an unused label sheet and hold both up to the light. Check the alignment at the top and bottom of the page before using your label paper.
Print the Finished Labels
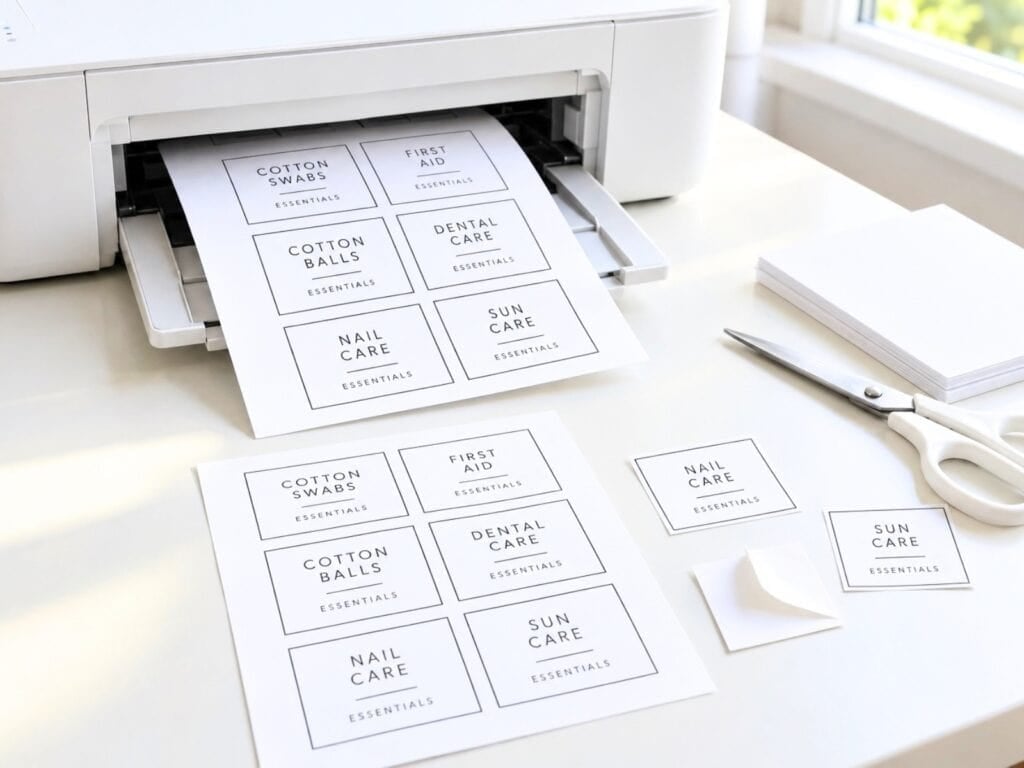
Load your sticker paper or cardstock according to your printer’s instructions, making sure it will print on the correct side.
Use paper made for your printer type and select the paper or media setting recommended by the paper manufacturer. Print one sheet first and let the ink dry as directed before cutting or handling it.
For full-sheet sticker paper, cut out each label and peel off the backing. For cardstock, cut out the labels and attach them using one of the methods below.
If Your Labels Don’t Print Correctly
- They’re too small or too large: Check that the PDF is printing at 100% or Actual Size and that the selected paper size matches the design.
- The edges are cut off: Move the labels farther from the page edges. Your printer may not be able to print across the entire sheet.
- They don’t line up with pre-cut labels: Confirm the template matches the exact product number. Check scaling and paper size before changing the design.
- The ink smears: Check that the paper is compatible with your printer and that you’re printing on the coated side. Follow the paper’s drying and media-setting instructions.
If you use a print shop, ask whether it can print on your chosen material before placing an order or bringing in sticker paper.
Laminating? Here’s When I Do It
If I know the label is going on a frequently used bin—like toys, bathroom supplies, or cleaning products—I’ll take the extra step to laminate it. It helps the label stay clean and intact, even with daily handling.
Section 4: Attach Your Labels
You’ve designed them, printed them, and now it’s time to put those beautiful labels to work! There are several ways to attach your labels, and the best one really depends on the type of container you’re working with and how often it gets handled.
Here’s what I’ve used in my own home (and what I’d recommend for different situations):
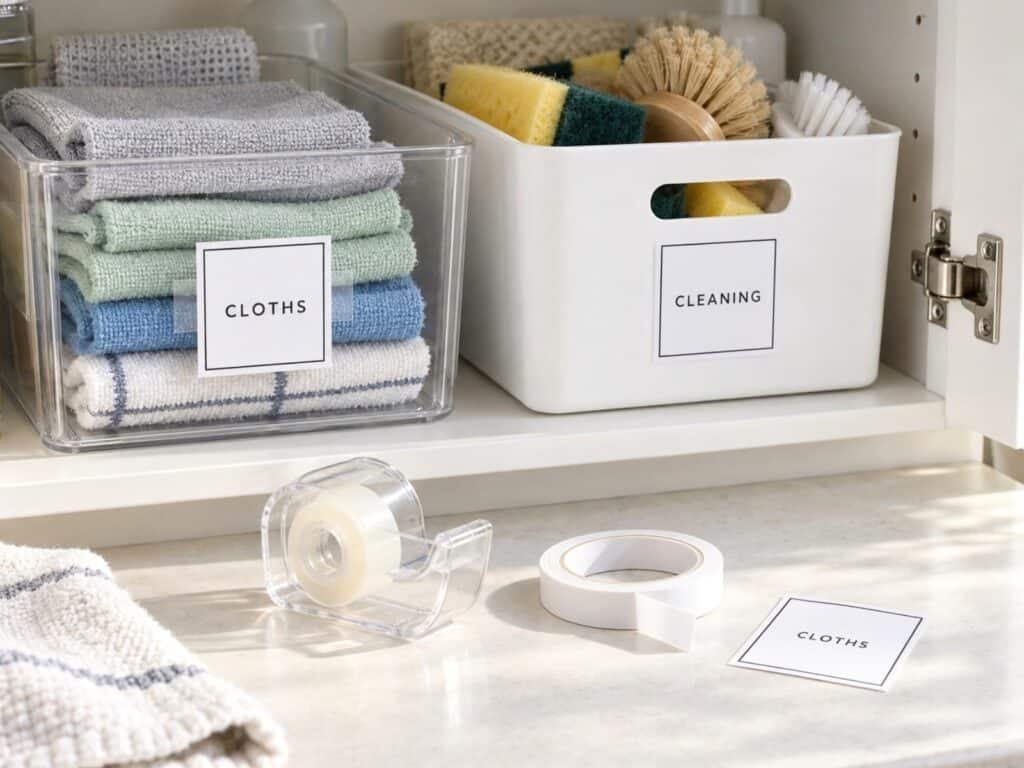
1. Tape (Clear or Double-Sided)
If you’re working with paper or laminated labels, clear tape is the quickest and easiest option. I use this most often inside drawers or cabinets where the labels don’t need to be pretty—just functional.
For a cleaner finish, double-sided tape hides the edges and works great on smooth plastic or metal bins.
Quick tip: If you frequently rearrange items, consider using removable double-sided tape to avoid leaving sticky residue later.
2. Ribbon or String
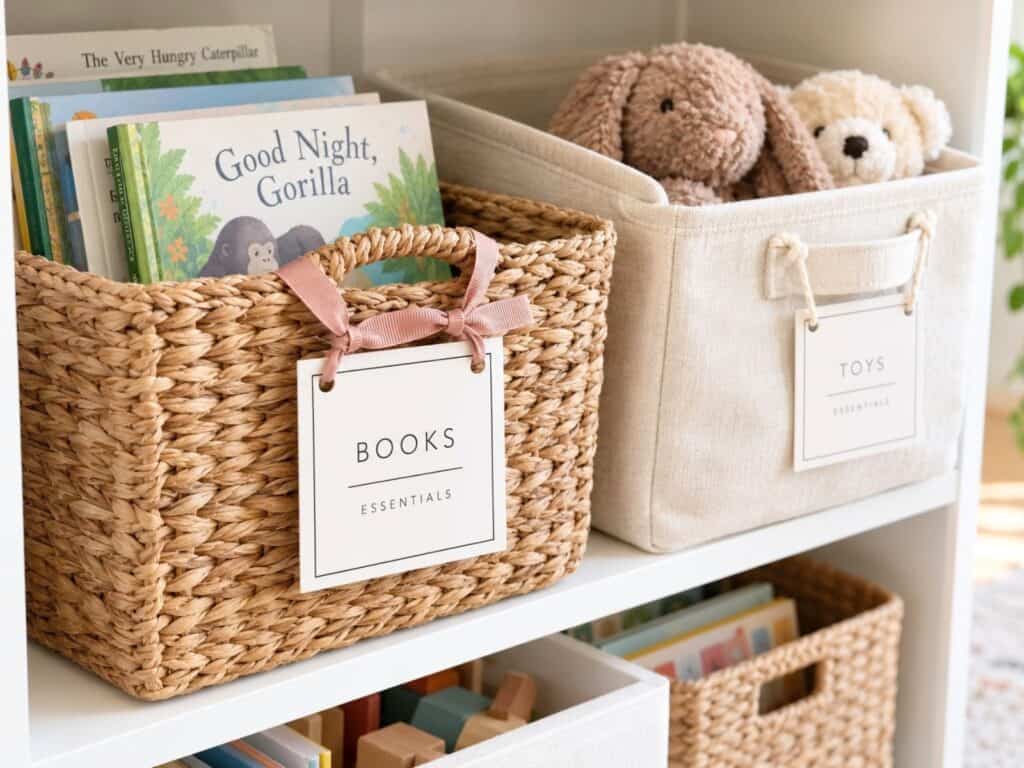
For baskets or fabric bins, I love using hole-punched cardstock labels and threading a pretty ribbon through them. It adds a decorative touch and feels more intentional, especially in open shelving or kids’ rooms.
You can tie a little bow, tuck the knot inside the bin handle, or let it hang loosely, depending on your style.
3. Velcro Dots
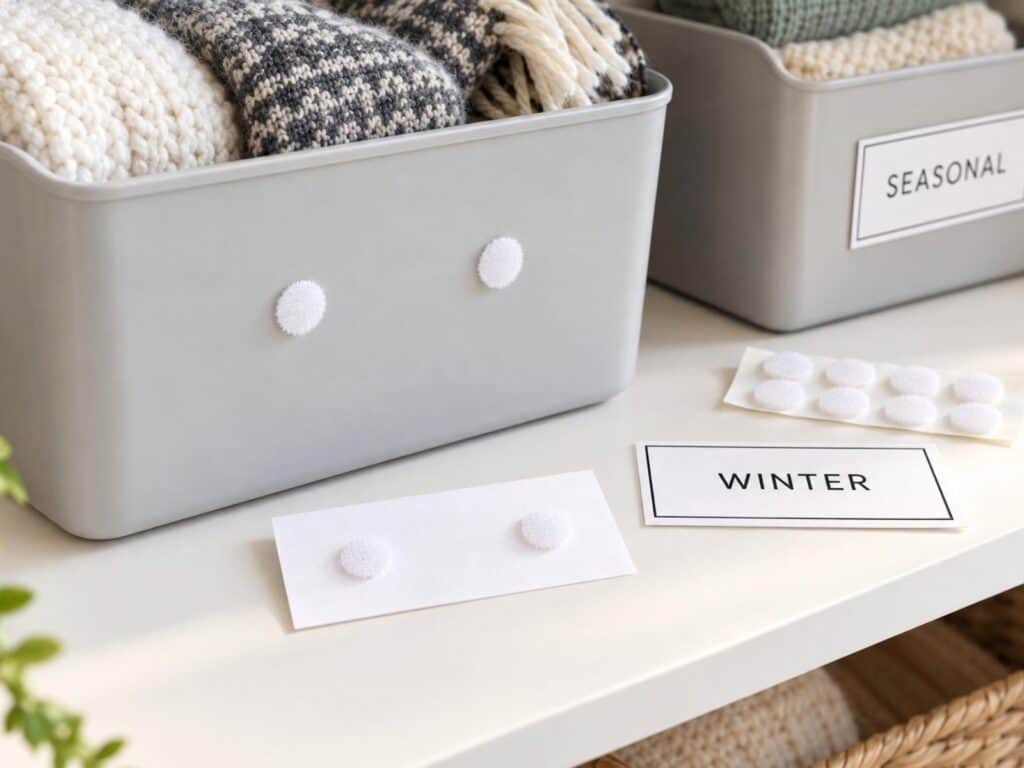
Velcro dots are perfect if you want your labels to be removable or interchangeable. I’ve used these on storage cubes in our basement and seasonal bins in the closet. Attach one side of the Velcro to the container and the other to the back of your label.
They’re especially handy when the contents of a bin change often—peel and swap!
4. Sticker Paper
If you printed your labels on sticker paper, you’re already halfway done! Just peel and stick.
I prefer clear sticker paper for sleek bins, glass jars, and other items that reside on open shelves. It gives that “custom store-bought” look with none of the effort.
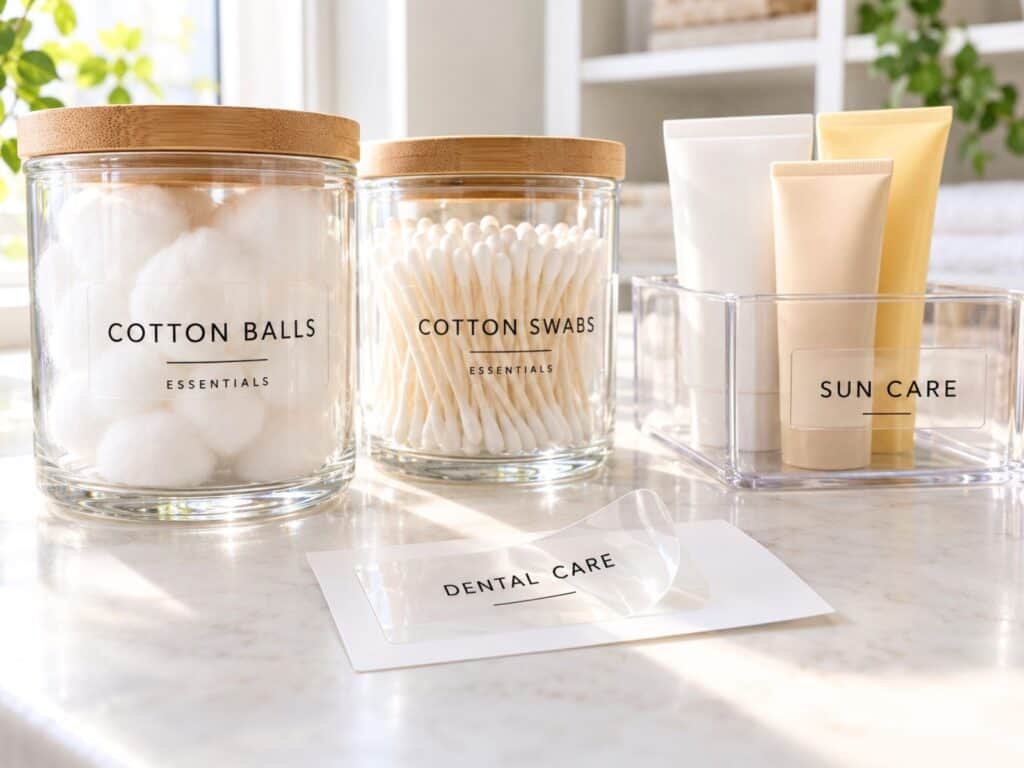
Pro tip: Ensure the surface is clean and dry before applying the label—it’ll stay in place much better and look crisper.
Choosing the Best Method
Here’s a quick rundown of what I use, where:
| Container Type | My Favorite Attachment Method |
| Plastic bins | Clear sticker paper or double-sided tape |
| Glass jars | Clear sticker paper |
| Fabric baskets | Ribbon + hole-punched label |
| Open shelving bins | Velcro dots or ribbon |
| Kids’ toys | Laminated cardstock + tape or Velcro |
You can mix and match based on what you have on hand—there’s no one right way to do it!
Section 5: Tips for Getting the Look Just Right
Designing labels in Canva is simple, but if you want that extra-polished, Pinterest-worthy finish, here are a few tricks I always keep in mind:
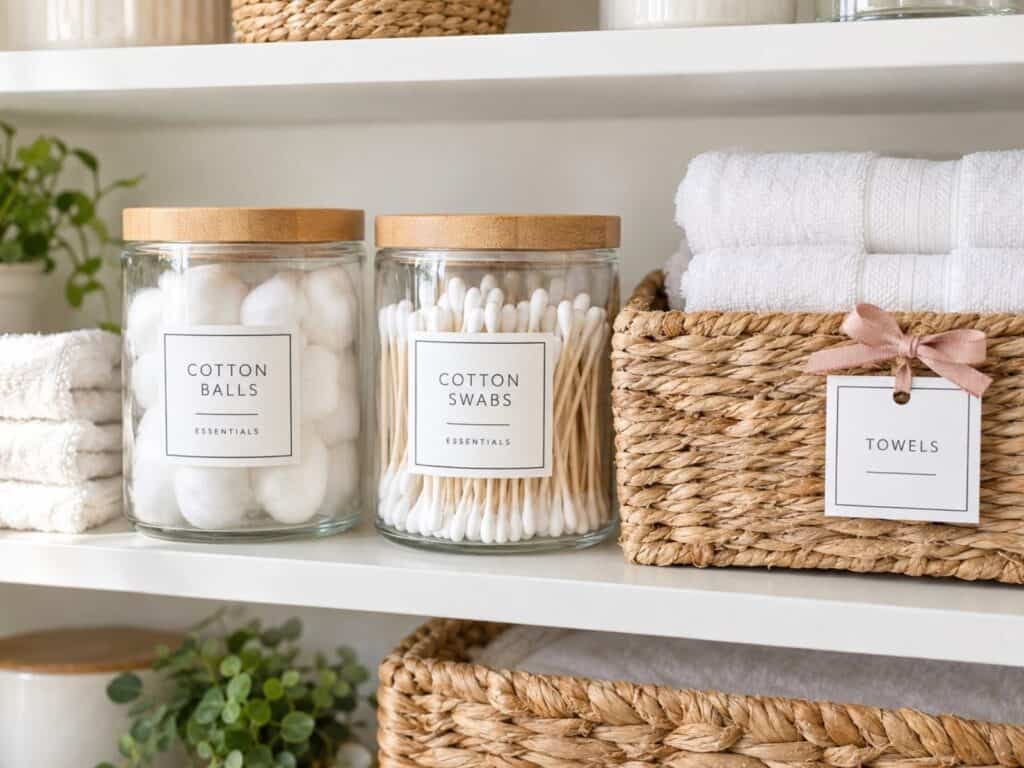
1. Don’t Overcrowd the Label
I know it’s tempting to squeeze in extra info—especially if the bin holds multiple things—but trust me, a clean label is easier to read and looks better.
Instead of “Flour, Sugar, Baking Soda,” stick with “Baking” and let the container do the rest. Or, break it into smaller bins and label each one clearly.
Remember: Labels are meant to guide, not explain everything inside.
2. Stick to 1–2 Fonts Max
When it comes to fonts, less is more. One decorative font (like a pretty script) paired with a clean, simple font makes your labels look intentional and balanced.
If you mix too many fonts, things start to feel chaotic, and that defeats the purpose of organizing in the first place.
Some combos I love:
- Playlist Script + Montserrat
- Brusher + Lato
- Libre Baskerville + Open Sans
3. Use Consistent Colors
Even if you’re creating labels for different areas of your home, maintaining a consistent color palette creates a sense of calm and cohesion.
I usually choose:
- One background color (white or soft beige)
- One text color (black, gray, or soft brown)
- And maybe a small accent color if needed
You can even match your labels to your home’s aesthetic—modern, boho, minimal, etc.
Pro tip: To reuse the same colors, save them in a Canva Brand Kit palette. Canva Free currently allows one palette with up to three colors. You can also keep a note of your color codes and font names so future labels match.
4. Save Your File (Trust Me on This One)
After you print, it’s easy to move on and forget about it—but I always recommend saving your Canva file with a clear and descriptive name.
That way, when you add a new bin or need to change a label, you can open the file, make the necessary adjustments, and then print. No need to redesign anything!
I usually name mine something like KidsCloset_Labels or PantryLabels so I can find it quickly.
These small details make a big difference—and they’re part of what turns your organizing project from “done” to beautifully done.
Loved a Label You Saw Online? Here’s How to Recreate It
Ever spot a label on Pinterest or Instagram and think, “I wish I could make something just like that for my own home”? You totally can—and it’s easier than you might think. Here’s how:
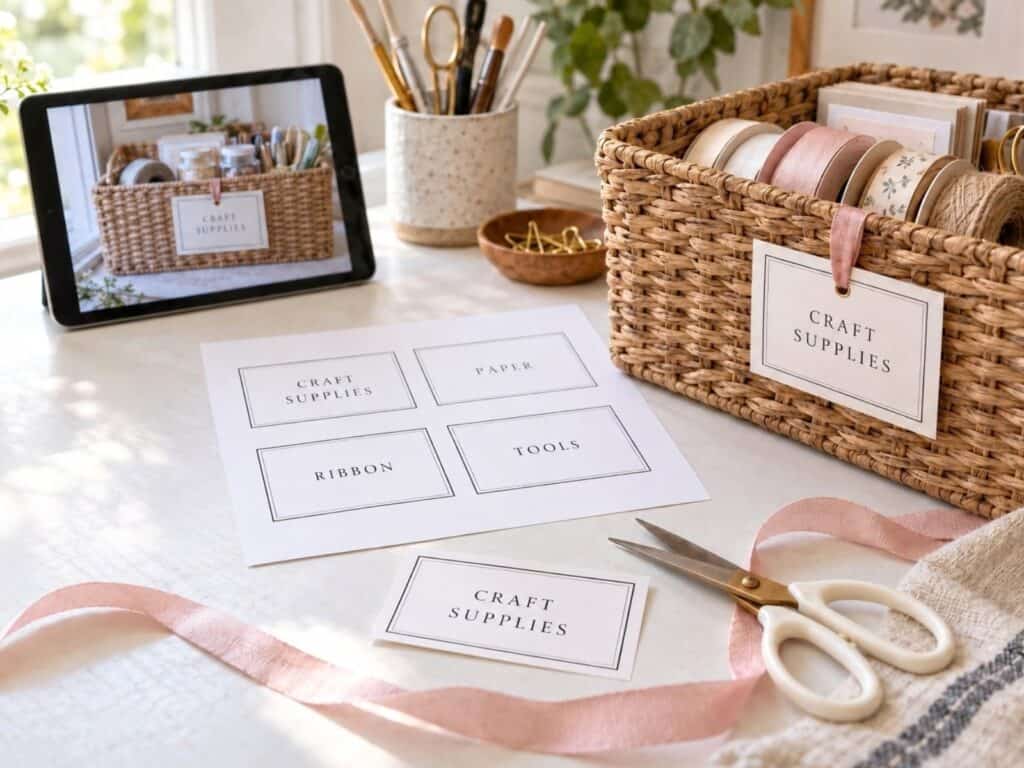
Use Canva + ChatGPT Together
Just describe the label you love—like the font style, wording, or layout—and ask ChatGPT to help you recreate it in Canva. You’ll receive step-by-step instructions and suggestions for fonts, shapes, and formatting that match the look you’re aiming for.
Upload a Photo
If you have a photo or screenshot of a label you want to replicate, you can even upload it to ChatGPT and ask for help recreating the design. It’s a great way to reverse-engineer a look you love without needing to start from scratch.
Whether it’s a boutique-style soap label or a pantry tag with the perfect font combo, you don’t need design experience to get the same look—you just need the right tools. Canva makes it easy, and ChatGPT can walk you through the rest.
Next time you find a label that makes your organizing heart flutter, don’t just save it—recreate it and make it your own.
Wrap-Up + What’s Next
And that’s it—you did it!
You’ve designed your labels from scratch, downloaded your custom sheet, printed them at home, and attached them like the organizing rockstar you are. Whether your labels showcase items in the pantry, organize toy bins, or add a touch of zen to your bathroom drawers, they’re working hard to make your home more beautiful and functional.
If you’re ready to keep the momentum going, I’ve got something special for you…
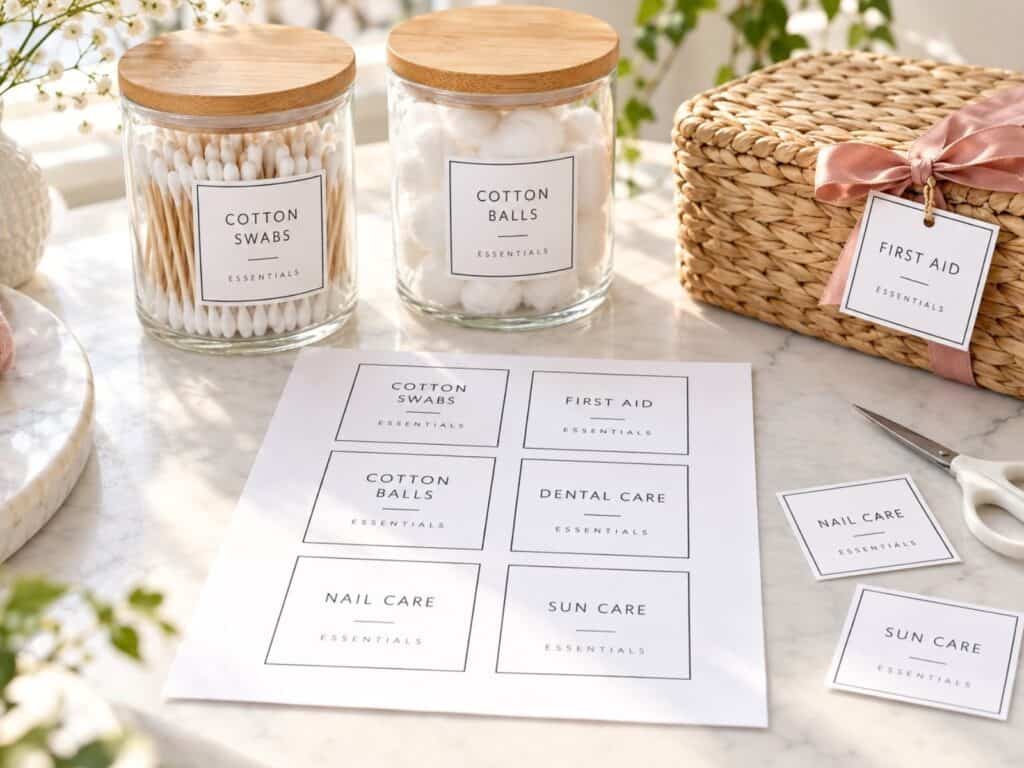
Grab Your Free Label Starter Pack!
I’ve pulled together a free little bundle to make your next project even easier. It includes:
- Printable Label Sheets– Print, cut, and adhere to bins, drawers, jars, and more.
- Editable Canva Templates – Click the link to open your own copy and customize labels for any room in your home.
- Label Ideas List – A ready-to-use inspiration sheet with 25+ common household items to label (pantry, bathroom, kids’ stuff—you name it!).
You can grab the free starter pack here and get labeling in minutes!
Want More Labeling Goodness?
If you loved this post, don’t miss these reader favorites:
Free Pantry Label Printables
Perfect for quickly upgrading your pantry without having to design from scratch.
How to Trace Labels Onto Clear Bins (Home Edit Style)
No fancy machines needed—just a Sharpie and this easy trick.